| The dashboard is broken up into multiple pages that allow you
to view information about the network scanner and modify its settings: |
| • |
Properties: Lists information about the scanner and its network
configuration. This page is useful when troubleshooting the scanner. |
| • |
Configuration: Allows you to adjust the scanner’s date and time
and network settings. |
| • |
Administration: Allows you to upgrade the scanner’s firmware,
reboot the scanner, and change the administrator password. |
| • |
Scanner Test: Allows you to test the features of the network scanner.
These tests can be useful if you need to troubleshoot the scanner or a specific feature of the scanner. |
| • |
Help: Lists detailed information about the other pages and their
options. |
The Configuration and Administration pages require a username and
password to access. The defaults are: |
| • |
Username: administrator |
| • |
Password: rdm123 |
|
| Properties: |
| |
Lists information about the scanner and its network configuration. This
page is useful when troubleshooting the scanner. |
 |
|
| Configuration: |
| |
Allows you to adjust the scanner’s date and time and network settings.
This page requires a username and password to access. |
The defaults are: |
| |
• Username: administrator
• Password: rdm123 |
|
| Administration: |
| |
Allows you to upgrade the scanner’s firmware, reboot the scanner, and
change the administrator password. This page requires a username and password to access. |
The defaults are: |
| |
• Username: administrator
• Password: rdm123 |
|
| Scanner Test: |
Allows you to test the features of the network scanner. These
tests can be useful if you need to troubleshoot the scanner or a specific feature of the scanner. |
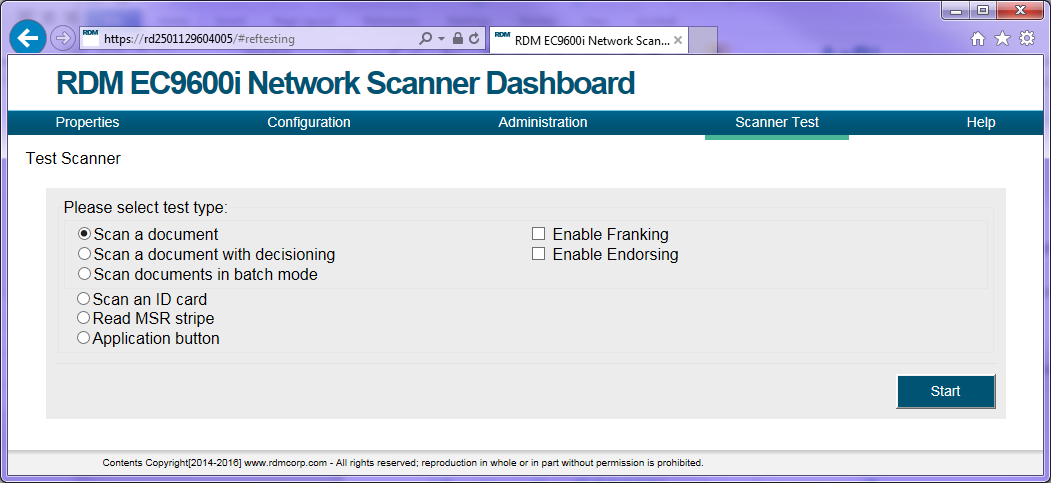 |
| The tests can include: |
| • |
Scan a document: Tests the scanner's ability to scan an item in single
feed mode, capture the front and back of the item, and read the MICR line. |
| • |
Scan a document with decisioning: Tests the scanner's ability to scan an
item in single feed mode, capture the front and back of the item, and read the MICR line. You are also prompted
to accept or reject the item. |
| • |
Scan documents in batch mode: Tests the scanner's ability to scan a batch
of items in an auto-feed scanning mode, capture the front and back of the items, and read the MICR lines. |
| • |
Scan an ID card: Tests the scanner's ability to scan and read ID cards,
such as a driver's license. |
| • |
Read MSR stripe: Tests the scanner's ability to read a card with a magnetic
stripe. After the test, the information contained in the magnetic stripe displays. |
| • |
Print sample receipt: Tests the scanner's ability to print receipts. |
| • |
Application button: Tests that the application button is functional. |
| After scanning a document, ID card, or MSR stripe, a dialog appears with
information about what was scanned. |
For example, after scanning a check, the following dialog appears: |
 |
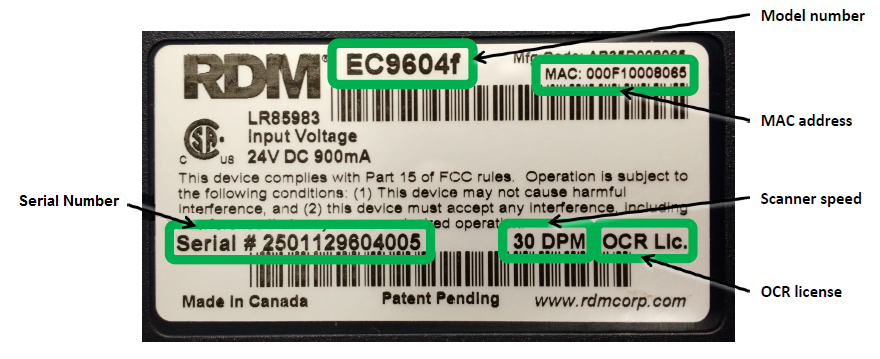
This dialog includes front and back images of the document, an IRN, and
the MICR number. The IRN is the Identification Reference Number which will include the unit's serial number
and the image number. The MICR is the Magnetic Ink Character Recognition line that includes the bank's
routing number, the customer's account number and the check that appears across the bottom of the check. |
|